
Soundee's bulk upload feature is designed to simplify the process of adding multiple beats to your beat-selling website. This guide will walk you through the steps to use this feature effectively. With bulk upload, you can save time and streamline your workflow by uploading multiple beats at once and organizing your beats into individual drafts for easy access and metadata editing.
In this guide, we’ll be exploring the quickest way to get your store up and running.
Table of Contents
Preparing Your Beats for Upload
Uploading the Beats with the Bulk Upload Feature
Managing Your Projects
Editing Metadata
Conclusion
1. Preparing Your Beats for Upload
Before you start the bulk upload process, ensure that your beats are well-organized as well as properly tagged, and ready for upload. Here are some tips:
Make sure you have all the untagged WAV files to your beats ready in an easily accessible folder.
Check and update your ‘Upload Preferences’. In these settings, you can adjust the default upload values for all the beats you’re going to upload.
2. Uploading the Beats with the Bulk Upload Feature
To begin using the bulk upload feature on Soundee, follow these steps:
Navigate to your studio dashboard and click on the ‘Tracks’ tab.
Look for the "Create Track” button, located in the top right corner.
Click on it. A pop-up will appear with two options.
Select and drag in all the untagged WAV files you want to upload to the left “Autotag” option.
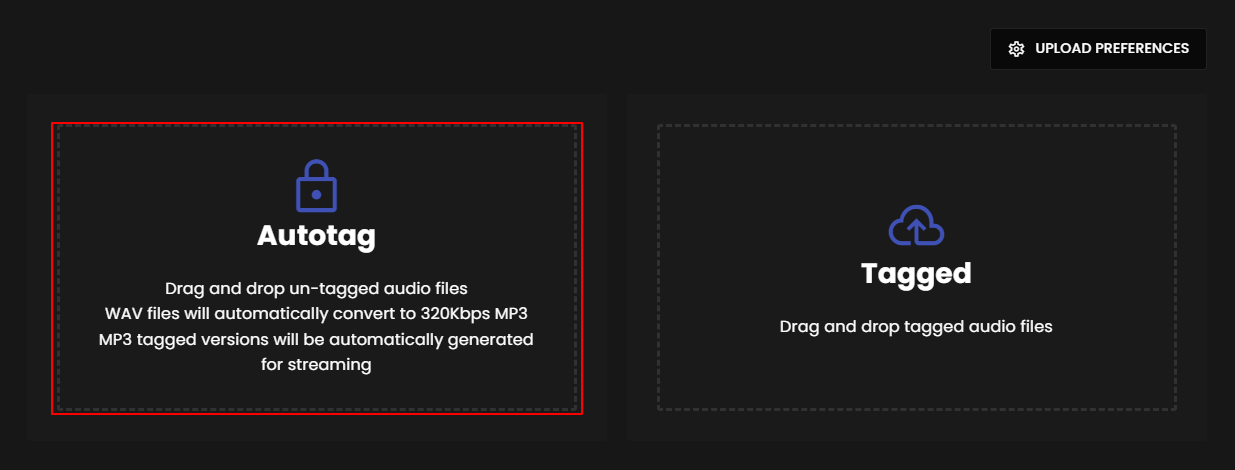
Soundee will begin uploading the beats one by one.
While the upload is in progress, you can monitor the status and see which beats have been successfully added.
3. Managing Your Drafts
After the bulk upload is complete, Soundee will automatically create individual drafts for each beat you uploaded. You will see that the untagged WAV and MP3 files are already uploaded.
Technically speaking, you could publish the tracks now and it would show up in your store. However, since you uploaded using the “Autotag” option, the beat in your store is now protected with the default Soundee tag.
You can change this later by going into each track individually to “re-upload the public file” and replace it with your own tagged mp3 version.
See the next step for more tips.
Access your drafts under ‘Drafts’ within the Tracks tab in your Studio Dashboard.
You should see the newly created drafts with your uploaded beats inside.
4. Editing Metadata
Now that your beats are uploaded, you can access and edit their metadata, as well as re-upload a new public file (usually your tagged version) within the individual tracks:
Click on a draft to open it.
Within the draft, you'll find the uploaded beat with its default values.
Edit the metadata as needed, such as title, description, price, or any other details specific to each beat.
(Optional) Change out the ‘Public File’ with your own custom-tagged MP3 file.
Save your changes.
5. Bulk Editing Metadata
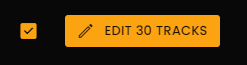
You can also bulk-edit the metadata of your beats. Just select multiple drafts at once by ticking the boxes, and clicking on “Edit “....” Tracks”.
You will then be presented with the option to update your metadata in bulk or delete your drafts.
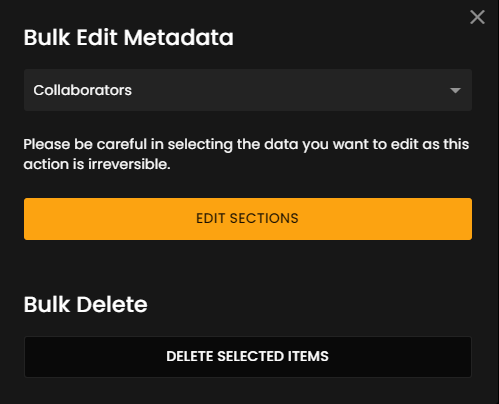
This is particularly useful if you want to edit data that aren’t in the default upload values, like adding collaborators, adding/removing your tracks in Playlists, or updating your artworks.
Check the full video walkthrough of this feature
If you have any questions, hop in our Discord!
Developer notes:
The bulk upload feature is currently in development and will be updated later this year with new configurations for a more efficient workflow.